2006/07/13
A simple color picker input on XUL
Today I'll show how to develop a binding that renders a simple color picker widget. This isn't something most people will need, but I did, so maybe you will too. This post also serves as a nice little example of the power and flexibility of XBL bindings.
I require a color picker input for an extension I'm currently working on. This extension requires that most interface elements to be customizable, styles included. This made having a color picker a mandatory requirement. So I started my quest for the information I'm about to give you. For free ;).
As usual, I thought at first that this was going to be real easy. I had some vague recollection of a XUL element that had this very purpose. So I looked it up and found it: the XUL colorpicker element. But alas, this was far from what I needed. This element is a little to low-level, if you look at it from the bright side. If you show the element as a button, you will see that this button opens as little popup that lets the user pick a color from a small grid. The problem is that clicking on any color on the grid does nothing. No color is picked. The grid remains open. It's just not fully functional. Or maybe I forgot to set the "pleasework" attribute to "true". Here's a screenshot of the element after being clicked:
Well, not really. It kind of gave me the idea of what I needed to do to solve this problem: wrap the partly functional XUL element with a binding that gave me what I really needed. The question was, what did I need? I wanted something simple, so a functional colorpicker element might do. But then I thought that I also wanted something a little more flexible, that would allow more advanced users to pick any color they wanted. I had to find a compromise between complexity and functionality, and in the end I settled with this:
Since my color input required to behave as a single unit (I wanted a single "value" attribute that could be set from a template or read from a script), an XBL binding was in order. Here's the code for the binding and a little explanation about it:
The content of the binding has two simple XUL elements: a textbox and a colorpicker. They both inherit the value attribute from the bound element, and they both implement methods that will update the "value" property when they are changed. The "onselect" handler in the colorpicker is worthy of notice, because that's one of the changes required to add proper functionality to the element. When a color is picked from the grid, this event is fired, but the "color" attribute is not changed, as it should. The "mPicker.color" property is the one that contains the newly selected color, so that's the one you want to use to set the value. The call of the "initialize" method on the picker is the other thing you need to keep in mind. For some reason the element is not properly initialized on the binding.
This binding is "template-friendly", as described on my Attributes and properties post. I also added a little validation on the constructor so that elements inside templates don't throw CSS errors. It's not a big deal, but the cleaner the better.
I've tested this input extensively and I'm very pleased with the end result. Hopefully this will prove to be useful for you as well.
I require a color picker input for an extension I'm currently working on. This extension requires that most interface elements to be customizable, styles included. This made having a color picker a mandatory requirement. So I started my quest for the information I'm about to give you. For free ;).
As usual, I thought at first that this was going to be real easy. I had some vague recollection of a XUL element that had this very purpose. So I looked it up and found it: the XUL colorpicker element. But alas, this was far from what I needed. This element is a little to low-level, if you look at it from the bright side. If you show the element as a button, you will see that this button opens as little popup that lets the user pick a color from a small grid. The problem is that clicking on any color on the grid does nothing. No color is picked. The grid remains open. It's just not fully functional. Or maybe I forgot to set the "pleasework" attribute to "true". Here's a screenshot of the element after being clicked:
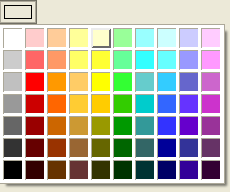
Well, not really. It kind of gave me the idea of what I needed to do to solve this problem: wrap the partly functional XUL element with a binding that gave me what I really needed. The question was, what did I need? I wanted something simple, so a functional colorpicker element might do. But then I thought that I also wanted something a little more flexible, that would allow more advanced users to pick any color they wanted. I had to find a compromise between complexity and functionality, and in the end I settled with this:

Since my color input required to behave as a single unit (I wanted a single "value" attribute that could be set from a template or read from a script), an XBL binding was in order. Here's the code for the binding and a little explanation about it:
<binding id="color-input">The color input would then be used in my XUL file as follows:
<content>
<xul:hbox>
<xul:textbox anonid="color-textbox" inherits="value"
onchange="this.parentNode.parentNode.value = this.value; return true;" />
<xul:colorpicker anonid="color-picker" type="button" inherits="color=value"
onselect="this.parentNode.parentNode.value = this.mPicker.color; return true;" />
</xul:hbox>
</content>
<implementation>
<constructor><![CDATA[
var picker =
document.getAnonymousElementByAttribute(this, "anonid", "color-picker");
var color = this.getAttribute("value");
picker.initialize();
/* avoid problems with templates. */
if (color && (color.search("rdf:") < 0)) {
this.value = color;
} else {
this.value = "#000000";
}
]]></constructor>
<property name="value"
onget="return this.getAttribute('value');">
<setter><![CDATA[
var picker =
document.getAnonymousElementByAttribute(this, "anonid", "color-picker");
var textbox =
document.getAnonymousElementByAttribute(this, "anonid", "color-textbox");
picker.color = val;
textbox.value = val;
this.setAttribute("value", val);
]]></setter>
</property>
</implementation>
<handlers>
<handler event="DOMAttrModified"><![CDATA[
if(event.attrName == "value") {
this.value = event.newValue;
}
]]></handler>
</handlers>
</binding>
<colorinput value="black" />Having the proper CSS binding set for the colorinput tag, obviously.
The content of the binding has two simple XUL elements: a textbox and a colorpicker. They both inherit the value attribute from the bound element, and they both implement methods that will update the "value" property when they are changed. The "onselect" handler in the colorpicker is worthy of notice, because that's one of the changes required to add proper functionality to the element. When a color is picked from the grid, this event is fired, but the "color" attribute is not changed, as it should. The "mPicker.color" property is the one that contains the newly selected color, so that's the one you want to use to set the value. The call of the "initialize" method on the picker is the other thing you need to keep in mind. For some reason the element is not properly initialized on the binding.
This binding is "template-friendly", as described on my Attributes and properties post. I also added a little validation on the constructor so that elements inside templates don't throw CSS errors. It's not a big deal, but the cleaner the better.
I've tested this input extensively and I'm very pleased with the end result. Hopefully this will prove to be useful for you as well.
Labels: color, colorpicker, colorzilla, css, nvu, style, xbl, xul

2006/07/08
Basic CSS handling
XUL applications will rarely lack CSS stylesheets. You will usually need them to style your windows, icons, etc. Pretty much anything the user will be looking at. An important advantage of this approach is that extensions become skinable. Theme developers can create themes that affect all browser appearance, including your extension. If your extension is popular enough, they might even override its specific styles, to make it blend in better with the theme.
But sometimes you'll need to handle CSS from your scripts, perhaps to have user-set styles. Doing this in Firefox is quite easy, because of its compliance with the DOM 2 Specification. The best way to learn about this is reading the DOM Level 2 Style Specification, from the W3. You'll find that most (if not all) objects decribed in this spec can be found in the XUL Planet specifications as well. They allow you to very easily manipulate stylesheets from XUL or any web page. It's the same for both, except that different stylesheets apply for each.
But I'm not the type to post a link and leave you hanging, even though those specifications are extremely helpful. One extension I was working required some style handling, so I'll show some of the stuff I had to do and the little details you need to keep in mind.
Your starting point is the following object:
Then I needed to work with some specific selectors (#main-page or .column, for example), so I extracted them from the rules in the following way:
Anyway, this code gives us a set of objects of type CSSStyleRule, which we can store somewhere and use afterwards. Getting and setting CSS properties is very easy now:
Well, that's all I have for today. I think this is a pretty decent introduction to CSS handling, both in XUL and regular web pages. I will complement this post in the future with another post on how to create a simple color selector.
But sometimes you'll need to handle CSS from your scripts, perhaps to have user-set styles. Doing this in Firefox is quite easy, because of its compliance with the DOM 2 Specification. The best way to learn about this is reading the DOM Level 2 Style Specification, from the W3. You'll find that most (if not all) objects decribed in this spec can be found in the XUL Planet specifications as well. They allow you to very easily manipulate stylesheets from XUL or any web page. It's the same for both, except that different stylesheets apply for each.
But I'm not the type to post a link and leave you hanging, even though those specifications are extremely helpful. One extension I was working required some style handling, so I'll show some of the stuff I had to do and the little details you need to keep in mind.
Your starting point is the following object:
document.styleSheetsThis is a StyleSheetList object (StyleSheetList in the W3). This object is basically an Array of the stylesheet that apply to your page. In my case, I only needed a specific stylesheet I inluded in my extension, so my code looks something like this:
var cssRules;Now the variable cssRules contains all the CSS rules that I had set in that specific file in my extension. I used the href property (from interface StyleSheet) to identify the file, and the cssRules property (from interface CSSStyleSheet) to obtain the rules.
for (i = 0; i < document.styleSheets.length; i++) {
if (sheets.item(i).href == "chrome://myextension/skin/myextension.css") {
cssRules = document.styleSheets.item(i).cssRules;
break;
}
}
Then I needed to work with some specific selectors (#main-page or .column, for example), so I extracted them from the rules in the following way:
for (i = 0; i < cssRules.length; i++) {
 cssRule = cssRules.item(i);

 if (cssRule.type == cssRule.STYLE_RULE) {
   switch(cssRule.selectorText) {
     case "*|#main-page":
     case "#main-page":
       pageRuleSet = cssRule;
       break;
     /* ... */
   }
 }
}
The cssRules object is a list of CSSRule objects, which can have different subtypes. I was only interested in CSSStyleRule objects, which are your typical style declarations, such as:#main-page {
background-color: black;
margin: 2em;
}
As you can see, I used a switch statement to discern between the different selectors. The case statements are doubled because of some odd quirk I found out during development: the selectors have their normal text set when the page is loading for the first time, but then they would have a "*|" prepended afterwards. Since this script is run on page load and reload, they would both have to catch both types of selectors. I really don't know what that prefix means.Anyway, this code gives us a set of objects of type CSSStyleRule, which we can store somewhere and use afterwards. Getting and setting CSS properties is very easy now:
bgColor = pageRuleSet.style.getPropertyValue("background-color");
pageRuleSet.style.setProperty("background-color", "black", "");
The third parameter in the setProperty method of interface CSSStyleDeclaration corresponds to the priority of the value. It can be either an empty string or "important". If you want your style to absolutely, positively apply all the time, then you should use "important". Otherwise, it's better to play nice and not use it. The one case where it's necessary to use "important" is when overriding styles for text link selectors in XUL. The applied styles won't work otherwise.Well, that's all I have for today. I think this is a pretty decent introduction to CSS handling, both in XUL and regular web pages. I will complement this post in the future with another post on how to create a simple color selector.
