2006/09/17
How to handle multiple profiles and installations
There are several places where you'll find information about this. This post is somewhat redundant, but I think it helps reinforce what's out there, and hopefully I'll be able to give some extra insight about these concepts. A good resource you can read and I used for this post is: How to Manage Profiles, from Mozilla support.
Some definitions
Let's start with the basics. In this post I will frequently refer to profiles and installations, so I should first explain how I define them.
An installation is the actual Mozilla (probably XUL Runner, too) application you install on your system. It can be Firefox, Thunderbird, Sunbird, etc. On Windows systems you will usually find it under "C:\Program Files\Mozilla Firefox" or something of the sort.
A normal user downloads and installs the latest version and then focuses on enjoying it. The auto update feature ensures the user is always up to date, safe and happy. It's a different story with developers and enthusiasts. We usually want to play with the latest versions, even if they haven't been officially released. This is when having multiple installations comes in handy.
Firefox 2 was recently in beta, and as a Firefox fan, I installed it and used it regularly. I started writing this post using Firefox 2 Beta 2, as a matter of fact (yes, I can be very slow). The stable version of Firefox at the time was 1.5.0.7, and I had that one installed too. I also have the latest "bleeding edge" development version of what will become Firefox 3, code name Minefield (warning: very unstable). Add to that the localized Spanish version of 1.5.0.7 and others.
An installation holds all the binaries and libraries required to run the program. On the other hand, profiles hold the user's information, such as bookmarks, history, browsing cache and installed extensions.
Think of your current operating system, such as Windows, Linux or Mac OS. Different users can log in with different user names and passwords, and all the customizations they perform on their system profile are saved independently from other users' profiles. Profiles in Firefox, Thunderbird, etc are similar in concept. You're allowed to have different "sub-users" in the same operating system user account. Each profile will hold its own bookmarks, history, cookies, etc. Everything that is associated with a specific individual will be kept in that profile, independent from other profiles. This way you'll be able to create "disposable" profiles that won't make you cry when you screw up and destroy years of gathering bookmarks in less than a second. Hasn't happened to me so far, I'm just saying...
How to set it up
OK, now let's get to work.
Installing multiple versions of an application on your computer should be easy enough. From now on I'll assume we're talking about Firefox, and that you already have your every-day default installation of Firefox on your computer.
Say you want to install another version of Firefox, such as a localized version or the latest alpha test version. On Windows all you need to do is select the advanced option in the installer, and take two settings into account. First, the installation folder. It should be different from the one in which you have your original installation. All installations should have different folders to avoid overwriting important files. Secondly, shortcuts. You should probably uncheck any shortcut option in the new installation, also to prevent overwriting. On Mac OS, all you need is to have different names for the applications so that one doesn't overwrite the other. Shortcuts are discussed later with more detail.
It's better that you don't run the newly installed version of Firefox until you're done reading the whole post. It may save your data.
Let's create some profiles. The first thing you need to do is run Firefox with the -p argument. On Windows you can do this by right-clicking on a Firefox shortcut (you probably want to make a copy of the shortcut and rename it as Profile Manager), clicking on Properties and adding "-p" (without quotes) at the end of the Target textbox, outside the quoted text. It should now look something like this:
"C:\Program Files\Mozilla Firefox\firefox.exe" -p
Click on Apply and close the Properties window. Close all Firefox windows. Double clicking the icon should open the Profile Manager now.
On other systems the easiest approach is to open a Terminal window and run Firefox with the -p option directly:
./firefox -p
You may need to be in the Firefox installation directory to do this. On Mac OS you don't need to close your Firefox windows to open the profile manager. I think it has something to do with the BSD roots of the operating system and the way it handles processes. Another point in their favor :).
The Profile Manager window looks something like this:

Creating and editing profiles should be easy enough. As a tip, use single words to name your profiles; it's easier to set up the shortcuts later this way.
How to run it
Let's assume that you created a new profile called "test". Note that if you use your original Firefox shortcut (without the -p option) you'll get your usual default profile. That's good because having new profiles shouldn't interrupt your normal browsing experience.
To open your new profile you need to create a shortcut using the -p option, followed by your profile name. On Windows it would be something like this:
"C:\Program Files\Mozilla Firefox\firefox.exe" -p test
Something similar applies to most Linux distributions, as most desktop managers should handle the shortcut concept that supports command line options. I won't list how to do it as there are probably lots of ways to do so.
On Mac OS X things are a little tricky. As far as I know, Mac OS doesn't have anything like shortcuts, so there are two alternatives that I'm aware of. The first one is simply to run firefox from the Terminal window, using a regular console. I don't like it because I'm not a fan of consoles. I wanted to find a way to emulate other architecture's shortcuts, so I finally came up with option number 2: Automator. Automator is a program that comes with Mac OS X, and it allows you to automate a number of tasks and workflows. There's a lot you can do with it, but for now we only care about running our profile. To do this, open Automator, in Applications. On the second column scroll down to an item called Run Shell Script and drag it to the panel on the right. Here's where you should add the script that opens your profile, or the Profile Manager for that matter. It should look something like this:
#!/bin/bash
/Applications/Internet/Firefox/Firefox.app/Contents/MacOS/firefox-bin -p test &
Run it just to check that it works. You can save the workflow anywhere you want. I particularly like the Desktop, because this workflow will in fact work as our shortcut. You'll have to change the default application of the workflow (Ctrl+click on the workflow > Get Info, Open with) so that it opens with Automator Launcher and not Automator. This way you get the full shortcut experience. That should do the trick.
To open the new profile, you need to first close all your Firefox windows (except on Mac OS) and open the new shortcut. If everything worked right, you'll see a Firefox window that looks fresh out of installation.
You've now successfully created a new profile and you're free to use it. You'll have a new set of bookmarks, history, extensions, themes and settings to play with. You'll be able to completely FUBAR this profile with no repercussions to your personal information. You can create as many profiles as you want and do with them as you please. That's one sweet deal in my opinion.
Mixing profiles and installations
Ok, so we're done we've seen how each to them work, now let's see how they work together. First of all I'll clarify that different Mozilla applications use a different set of profiles, so your Firefox information and your Thunderbird information are completely independent. This is kind of expected, but it's good to know.
On the other hand, different flavors of the same applications will use the same sets of profiles. So if you install Firefox 1.5 and Firefox 2 on the same computer, they will in fact use the same profiles. Again, expected, as you don't want users having to migrate information when they upgrade. But this is very important if you're testing alpha versions or localized versions of Firefox in the same computer. These applications come with no guarantee regarding your personal information. They are developer testing versions and should not be used unless you understand you could lose everything.
So here's my advice to you: if you're playing with multiple versions of Firefox (or Thunderbird or whatever): you should create profiles exclusively for these applications. Do not use your main profile for them, as they may be using different storage schemes or pre-production code which may damage your information.
OK, so now let's get to it. It's actually quite simple. If you read all the shortcut juggling how-to, you may have noticed (or already knew) that these shortcuts have two parts: the application, and the additional options, in our case profile selection. As I mentioned at the beginning of this now enormous blog post you should have your installations on different paths, so if you want to open the test profile you created with your other version of Firefox, all you need to do is change the first part of your shortcuts to point to this version. Something like this:
"C:\Program Files\Mozilla Firefox 3 Alpha\firefox.exe" -p test
So if you're a regular alpha tester or builder, and like to get your hands dirty frequently, I would recommend as a general practice to have dedicated profiles for these test versions, and to have specific customized shortcut to access them. Never, ever double click right away on the shortcut of an alpha version unless you know the risk of opening it with your default profile.
This is of course playing if safe, as Firefox engineers don't make a habit out of releasing code that will delete all your information. But people make mistakes, and you should always take that in mind.
It took a long time to write this, so I expect some gaps to exist. Hopefully the basics were covered and at least adequately explained. If you spot any blatant errors, please let me know ;)
Labels: firefox, installation, profile, thunderbird
2006/07/17
How to preserve scope in Javascript function calls
Developing all of your application logic in Javascript is a bit of a challenge if you grew up in a world of full object orientation and languages like C++, Java and C#. I still have a very strong OO inclination, so I use it in my code as much as possible. I feel this makes things easier to understand and better organized. Leaving dozens or hundreds of loose functions and variables in your code makes things so much harder for everyone. In my opinion it's better to know precisely what object knows X and what object is responsible for doing Y. I'm sure I'm not alone on this. Please stop using globals.
In my own personal experience, and after reading thousands of lines of Mozilla code, I've come to the conclusion that plain classes and objects are pretty rare in XUL code. It's much more common to use the so-called static classes, which are kind of like singletons. The syntax to create such an object goes like this:
var MyObject = {
attribute1 : 5,
attribute2: null,
function1 : function() {alert(this.attribute1); },
function2 : function(param1, param2) {  /* ... */  }
}
You get the idea. The MyObject object doesn't really have a class. It's a class and an instance declaration, all in one. You can call its methods or get or set its attributes (obviously not recommended, that's what methods are for) in the usual way:
someResult = MyObject.function1();
MyObject.attribute1 = 7;
You can use the "this" identifier inside the object just like you would on any object, and all attributes preserve their state as long as the object exists.
But there's a problem with this, and maybe you already ran into it. Under certain circumstances you reach for your attributes and end up with uninitialized variables that are not what you expected. This probably happened because you used the method of an object as a callback function for some asynchronous event. Classic examples of this are the "window.setTimeout" function, event handlers and observers. You're probably passing a pointer to your method like this:
window.setTimeout(MyObject.function1, 1000);
This is OK. The problem happens on the other end. Say you execute the following code:
MyObject.attribute1 = 10;
window.setTimeout(MyObject.function1, 1000);
You'll notice the alert box is showing the value "5" as opposed to "10". All variables will be uninitialized, and you'll find yourself as if you had a completely different object. And you do. Since these callbacks occur in a different scope, they don't see the MyObject object we created. They call "function1" as if it were any loose function, so it runs completely out of context. I don't entirely understand what goes on here, but we don't need to. What we need is a solution.
Some valuable feedback made me change the preferred solution in this post. There are some important aspects to consider here, such as elegance and readability of code. My first solution was elegant in that it doesn't use anonymous functions - which I avoid like the plague - but it fails in being very nice to look at. It looks too much like a hack. The solution proposed in the comments below is much more easier to look at, albeit relying on the dreaded anonymous functions. It is also more general. As you'll see in the explanation for the old solution, this only works for static objects, and uglier hacks are required for regular objects or XBL inner objects.
The old solution - do not use!
You rewrite "function1" like this:
function1 : function() {
if(this != MyObject) {
 return MyObject.function1();
}
alert(this.attribute1);
},
This odd hack is enough to fix the problem. The "if" statement checks whether the method is being called in the right scope. If it isn't, the right call is performed, and the first call returns without executing the rest of the code. It's the second one, the method inside our object, that does all the work. Now we'll see the "10" we wanted.
You may feel tempted to just add this code to all of your functions and don't worry about this problem ever again. Don't. This is not a pretty hack, and adding so much code is very unnecessary. It's also better that you realize when it's required and when it isn't.The linked reference, Preserving Scope in JavaScript, shows a wider array of solutions which you may find handy for other situations of lost scope.
The new solution
Rewrite the asynchronous scheduling like so:
window.setTimeout(function(){MyObject.function1();}, 1000);Easy, right? Now the asynchronous call will be performed on the anonymous function, which will in turn call the function in our object, this time in the way we expect. The same will work with instances of regular classes, or functions inside XBL bindings.You may feel tempted to add more and more code inside the anonymous function, but I strongly recommend against this practice. Anonymous functions make it very hard to debug and read Javascript code. Please use them with moderation, preferably only as proxies for a single function or method call.
Labels: asynchronous, javascript, scope, timeout, xul
2006/07/13
A simple color picker input on XUL
I require a color picker input for an extension I'm currently working on. This extension requires that most interface elements to be customizable, styles included. This made having a color picker a mandatory requirement. So I started my quest for the information I'm about to give you. For free ;).
As usual, I thought at first that this was going to be real easy. I had some vague recollection of a XUL element that had this very purpose. So I looked it up and found it: the XUL colorpicker element. But alas, this was far from what I needed. This element is a little to low-level, if you look at it from the bright side. If you show the element as a button, you will see that this button opens as little popup that lets the user pick a color from a small grid. The problem is that clicking on any color on the grid does nothing. No color is picked. The grid remains open. It's just not fully functional. Or maybe I forgot to set the "pleasework" attribute to "true". Here's a screenshot of the element after being clicked:
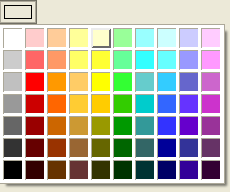
Well, not really. It kind of gave me the idea of what I needed to do to solve this problem: wrap the partly functional XUL element with a binding that gave me what I really needed. The question was, what did I need? I wanted something simple, so a functional colorpicker element might do. But then I thought that I also wanted something a little more flexible, that would allow more advanced users to pick any color they wanted. I had to find a compromise between complexity and functionality, and in the end I settled with this:

Since my color input required to behave as a single unit (I wanted a single "value" attribute that could be set from a template or read from a script), an XBL binding was in order. Here's the code for the binding and a little explanation about it:
<binding id="color-input">The color input would then be used in my XUL file as follows:
<content>
<xul:hbox>
<xul:textbox anonid="color-textbox" inherits="value"
onchange="this.parentNode.parentNode.value = this.value; return true;" />
<xul:colorpicker anonid="color-picker" type="button" inherits="color=value"
onselect="this.parentNode.parentNode.value = this.mPicker.color; return true;" />
</xul:hbox>
</content>
<implementation>
<constructor><![CDATA[
var picker =
document.getAnonymousElementByAttribute(this, "anonid", "color-picker");
var color = this.getAttribute("value");
picker.initialize();
/* avoid problems with templates. */
if (color && (color.search("rdf:") < 0)) {
this.value = color;
} else {
this.value = "#000000";
}
]]></constructor>
<property name="value"
onget="return this.getAttribute('value');">
<setter><![CDATA[
var picker =
document.getAnonymousElementByAttribute(this, "anonid", "color-picker");
var textbox =
document.getAnonymousElementByAttribute(this, "anonid", "color-textbox");
picker.color = val;
textbox.value = val;
this.setAttribute("value", val);
]]></setter>
</property>
</implementation>
<handlers>
<handler event="DOMAttrModified"><![CDATA[
if(event.attrName == "value") {
this.value = event.newValue;
}
]]></handler>
</handlers>
</binding>
<colorinput value="black" />Having the proper CSS binding set for the colorinput tag, obviously.
The content of the binding has two simple XUL elements: a textbox and a colorpicker. They both inherit the value attribute from the bound element, and they both implement methods that will update the "value" property when they are changed. The "onselect" handler in the colorpicker is worthy of notice, because that's one of the changes required to add proper functionality to the element. When a color is picked from the grid, this event is fired, but the "color" attribute is not changed, as it should. The "mPicker.color" property is the one that contains the newly selected color, so that's the one you want to use to set the value. The call of the "initialize" method on the picker is the other thing you need to keep in mind. For some reason the element is not properly initialized on the binding.
This binding is "template-friendly", as described on my Attributes and properties post. I also added a little validation on the constructor so that elements inside templates don't throw CSS errors. It's not a big deal, but the cleaner the better.
I've tested this input extensively and I'm very pleased with the end result. Hopefully this will prove to be useful for you as well.
Labels: color, colorpicker, colorzilla, css, nvu, style, xbl, xul
2006/07/08
Basic CSS handling
But sometimes you'll need to handle CSS from your scripts, perhaps to have user-set styles. Doing this in Firefox is quite easy, because of its compliance with the DOM 2 Specification. The best way to learn about this is reading the DOM Level 2 Style Specification, from the W3. You'll find that most (if not all) objects decribed in this spec can be found in the XUL Planet specifications as well. They allow you to very easily manipulate stylesheets from XUL or any web page. It's the same for both, except that different stylesheets apply for each.
But I'm not the type to post a link and leave you hanging, even though those specifications are extremely helpful. One extension I was working required some style handling, so I'll show some of the stuff I had to do and the little details you need to keep in mind.
Your starting point is the following object:
document.styleSheetsThis is a StyleSheetList object (StyleSheetList in the W3). This object is basically an Array of the stylesheet that apply to your page. In my case, I only needed a specific stylesheet I inluded in my extension, so my code looks something like this:
var cssRules;Now the variable cssRules contains all the CSS rules that I had set in that specific file in my extension. I used the href property (from interface StyleSheet) to identify the file, and the cssRules property (from interface CSSStyleSheet) to obtain the rules.
for (i = 0; i < document.styleSheets.length; i++) {
if (sheets.item(i).href == "chrome://myextension/skin/myextension.css") {
cssRules = document.styleSheets.item(i).cssRules;
break;
}
}
Then I needed to work with some specific selectors (#main-page or .column, for example), so I extracted them from the rules in the following way:
for (i = 0; i < cssRules.length; i++) {
 cssRule = cssRules.item(i);

 if (cssRule.type == cssRule.STYLE_RULE) {
   switch(cssRule.selectorText) {
     case "*|#main-page":
     case "#main-page":
       pageRuleSet = cssRule;
       break;
     /* ... */
   }
 }
}
The cssRules object is a list of CSSRule objects, which can have different subtypes. I was only interested in CSSStyleRule objects, which are your typical style declarations, such as:#main-page {
background-color: black;
margin: 2em;
}
As you can see, I used a switch statement to discern between the different selectors. The case statements are doubled because of some odd quirk I found out during development: the selectors have their normal text set when the page is loading for the first time, but then they would have a "*|" prepended afterwards. Since this script is run on page load and reload, they would both have to catch both types of selectors. I really don't know what that prefix means.Anyway, this code gives us a set of objects of type CSSStyleRule, which we can store somewhere and use afterwards. Getting and setting CSS properties is very easy now:
bgColor = pageRuleSet.style.getPropertyValue("background-color");
pageRuleSet.style.setProperty("background-color", "black", "");
The third parameter in the setProperty method of interface CSSStyleDeclaration corresponds to the priority of the value. It can be either an empty string or "important". If you want your style to absolutely, positively apply all the time, then you should use "important". Otherwise, it's better to play nice and not use it. The one case where it's necessary to use "important" is when overriding styles for text link selectors in XUL. The applied styles won't work otherwise.Well, that's all I have for today. I think this is a pretty decent introduction to CSS handling, both in XUL and regular web pages. I will complement this post in the future with another post on how to create a simple color selector.
2006/07/06
Attributes and properties: the essential difference
If you have a XUL element object on your script, you can get or set an attribute like so:
someValue = element.getAttribute("someAttribute");
element.setAttribute("someAttribute", someValue);
Getting and setting properties is done like this:someValue = element.someProperty;There are some differences between attributes and properties. Properties can be read-only, which means that setting them will throw an error. Properties can be handled a little more "naturally" in javascript, because handling of properties is done in the same way it's done with any object. No need to know that the element is, in fact, a XUL element. You just need to know what properties and methods are available in the object. Makes the code nicer.
element.someProperty = someValue;
But that's not such a big deal. Here's the big deal: setting attributes may not yield the result you expect. Suppose you have an empty textbox and want to set its value in a script. Let's execute the following code and see what happens:
textbox.value = "First value";After this code is executed, the textbox will be showing "First value", but if you look at the textbox element with the DOM Inspector, you'll see that it's attribute "value" will have a value of "Second value". Now that's weird. Or so I think.
textbox.setAttribute("value", "Second value");
What happened? Well, element attributes will be used to set the element's internal state at load time, but you have no guarantees that changing them at runtime will have any effect. Properties are the opposite: you can be sure that setting a property or running a method will change the internal state of the object like you would expect.
OK, so this means you should favor using properties over attributes at all times. That's no problem, right? I already mentioned some advantages of properties, and the code will look much cleaner using them instead of attributes. It's a no-brainer. Problem solved.
Oh, wait. I forgot about templates. Using templates you can make an element change the value of its attributes dynamically, depending on a datasource. On my last post, I had a textbox that uses a template to show its value:
<textbox value="rdf:http://mypage.com/my-schema#some-value" />This won't work. I mean, it will show the value from the template properly, but changing the value in the datasource will have no effect in the generated element. Maybe doing a full template rebuild will work, but this shouldn't be necessary. The problem is that the template knows nothing about properties. It only deals with element attributes, so changing the value in the datasource will in effect cause a setAttribute call, which does nothing for the state of the element, as mentioned previously.
To work around this issue, an event called DOMAttrModified comes to the rescue. This event is triggered every time an attribute is changed in the element. The improved textbox looks like this:
<textbox value="rdf:http://mypage.com/my-schema#some-value"This works. The code in the event handler can be taken out to a script, obviously. The "attrName" property of the event object tells us which attribute was changed, and the "prevValue" and "newValue" properties give us the previous value and new value, respectively. This snippet of code turns the setting of the attribute into the setting of a property. This way all updates in the datasource will be properly reflected in the page.
DOMAttrModified="if(event.attrName == 'value') this.value = event.newValue; return true;" />
This event has proved to be quite handy, specially when working with XBL. Bindings will let you add a constructor, with which you can set the internal state of your element with the values of the different attributes it has set. But the only way you'll know an attribute has been changed afterwards is to add a DOMAttrModified handler to your binding. Then you can do something similar as with the textbox example, and convert the setting of an attribute to a setting of a property.
I'm not quite sure why is it that attributes can be independent to the state of the object, but I guess there's a decent reason behind it. Perhaps it's just standard. I don't know.
But now you know how to work around it.
Labels: attribute, event, javascript, property, xbl, xul
2006/07/05
How to handle text and keep your sanity
Labels are supposed to be used for the small bits of text you see all around an interface: menu labels, titles, form fields, etc. They're usually short (2 or 3 words) and need to be shown without breaks. And that's what a label will do. The following:
<label value="Some text here" />Will display whatever you type in the value attribute in one line. The Gecko engine will try its best to show the full label, and in the very worst case, it will be cropped. No line breaks. No way, no how. And it makes sense to have such an element in your interface language. You don't want things like menu items or titles to be multiline. Things would get pretty ugly.
Description elements are used for longer texts. They are also used for text that could be short or long, and you just don't know. This is the tag to use when you're adding explanations or other pieces of text that may break into multiple lines. You'll find some of those in the Options window. Now here's where the quirks start to appear.
<description value="Some very, very long text here" />Will this text break under the right circumstances? No. Using the value attribute will always produce a single-line block of text. It's exactly the same as using the label element. What you want to do is the following:
<description>Some very, very long text here</description>That breaks, when the available width is insufficient. As a general rule of thumb, you should remember to always use the label element with the value attribute, and always use the description element with the inner text node. Use label when you don't want breaks. Use description otherwise.
Now, how about introducing text with breaks? That's a little different. Doing the following makes no difference:
<description>Some very, veryAll breaks and white space is collapsed into a single white space, just like with HTML. We're missing something here. After a little quest for information I found a solution in the following blog post: XUL Description Revisited. A few solutions are reviewed, and the most elegant by far consists on doing the following:
long text here</description>
<description style="white-space: pre;">Some very, veryA little stylin' saved the day :). This is the same as using the HTML "pre" tag, so have to be careful about all white space and breaks in the text, including before and after the text.
long text here</description>
Dynamically generated text
So far things have been fairly easy. But sometimes you'll need to handle text in more complicated ways, and things get very tricky. This is something I had to deal with a lot of frustration while developing a relatively complex extension. This issue relates directly with templates, but may also be relevant for XBL.
Creating text with breaks on a template proved to be quite a headache for me. I ran into a bit of a paradox. It's easy to make an attribute of an element be assigned dynamically from the datasource:
<label value="rdf:http://mypage.com/my-schema#some-value" />Clearly this won't work with the description element, at least not in the way we need it. But worry not, template designers thought of this and came with a rather elegant solution. You can use a "text" element to represent a text node. So all you need to do is this:
<description>That's not so hard, now is it? This is where the irony kicks in: the "text" element generates a text node that doesn't break! I couldn't help but laugh... oh, well. I tried a million different ways to get the damn thing to break, but I just couldn't. When is this element useful then? Maybe to do stuff in HTML, I don't know.
<text value="rdf:http://mypage.com/my-schema#some-value" />
</description>
Back to the drawing board. For a while I used a workaround and just divided the text into multiple single-line description elements (should've been label according to my own rule, :P), but this just didn't cut it. My extension required the text field to have relatively arbitrary widths, so this was not an acceptable solution.
So it came down to using the multi-purpose textbox element. I left it as a last resource because I see it more as an input element, so I feel it's kind of a bad practice to use it for read-only text. But this was my last hope, so I had to give it a try. And here it is, in all its wonder:
<textbox class="plain" style="background-color: transparent;" flex="1"This yields exactly what I needed: a read-only, vertically flexible text field that wraps intelligently. Nirvana.
multiline="true" readonly="true"
onoverflow="this.height = this.inputField.scrollHeight;"
DOMAttrModified="if(event.attrName == 'value') this.value = event.newValue; return true;"
value="rdf:http://mypage.com/my-schema#some-value" />
The class is set to "plain" so that the border doesn't show. The background color is set explicitly to counter the ugly color that's set for read-only textboxes. The onoverflow event makes the textbox adjust its height dynamically, according to the text it contains. Finally, the DOMAttrModified keeps the contents of the textbox consistent with the value that's set by the template. Changing the value attribute does not change the displayed value automatically. I'll dig a little deeper into this in a future post.
So there you have it. Labels, descriptions and textboxes. There's always a way, though not always pretty.
Labels: description, label, line break, multiline, text, textbox, xul
2006/07/04
Creating an uninstall script for an extension
Here's where we run into a little problem: when the extension is uninstalled, the preference remains because it doesn't have it's default value set, and Firefox keeps those just in case they're needed for future installs of the same or even other extensions. So, if I install version X, uninstall it, and then install version Y, it looks like I'm doing an upgrade from X to Y, when in reality I'm doing a fresh install. So now we're need of an uninstall script, to clear this preference.
Uninstall scripts can certainly be needed for many other purposes, specially in the more complex extensions. You may need to delete files you created and won't be using anymore, make sure your preferences are removed, or undo other changes that were done on install. I would say it's professional courtesy to cleanly remove your extension and not leave lots of junk behind.
So let's get to it. As with the install script, you'll need to overlay the main window, adding a script element:
<overlay id="homepage-overlay"Clearly, you can use the same overlay and script you used for the post-install script, if that's the case. The add something like this:
xmlns="http://www.mozilla.org/keymaster/gatekeeper/there.is.only.xul">
<script type="application/x-javascript"
src="chrome://myextension/content/overlay.js" />
</overlay>
const MY_EXTENSION_UUID = "{CEDB5187-8A58-4958-ACF5-F6CD3BEF1927}";
function initializeOverlay() {
UninstallObserver.register();
}
var UninstallObserver = {
_uninstall : false,
observe : function(subject, topic, data) {
  if (topic == "em-action-requested") {
    subject.QueryInterface(Components.interfaces.nsIUpdateItem);

    if (subject.id == MY_EXTENSION_UUID) {
      if (data == "item-uninstalled") {
        this._uninstall = true;
      } else if (data == "item-cancel-action") {
        this._uninstall = false;
      }
    }
  } else if (topic == "quit-application-granted") {
    if (this._uninstall) {
      /* uninstall stuff. */
    }
    this.unregister();
  }
},
register : function() {
 var observerService =
   Components.classes["@mozilla.org/observer-service;1"].
     getService(Components.interfaces.nsIObserverService);

 observerService.addObserver(this, "em-action-requested", false);
 observerService.addObserver(this, "quit-application-granted", false);
},
unregister : function() {
  var observerService =
    Components.classes["@mozilla.org/observer-service;1"].
      getService(Components.interfaces.nsIObserverService);

  observerService.removeObserver(this,"em-action-requested");
  observerService.removeObserver(this,"quit-application-granted");
}
}
window.addEventListener("load", initializeOverlay, false);
I remove all documentation from the code due to space constraints. I don't want these posts to be longer than necessary. Rest assured that I'm quite obsesive about proper documentation. I just think that these little tips are more readable without it. But I'll always explain the general idea behind the code I post.First, notice the UninstallObserver object. It's declared as a javascript singleton because we don't need more than one instance. The register and unregister methods basically add and remove this object as an observer for the "em-action-requested" (the "em" stands for Extension Manager) and the "quit-application-granted" topics. This means that the object's observe method will be called every time an action is performed in the Extension Manager, such as installation, uninstallation, enabling, or disabling of extensions, and when the application is going to exit.
In our observe method, we look for the id (UUID) of our extension. This way we know we're dealing with our extension alone. Then we look for the actions we want to observe. In this case we're interested in the "item-uninstalled" action. When the extension is set to be uninstalled, our _uninstall flag will be set to true. Also note we listen to the "item-cancel-action" action. This is very important, because the user can actually cancel uninstallation by right-clicking on the extension in the Extension Manager and selecting the Enable option. This way we know for sure the flag represents the final decision of the user.
Note that we used the "quit-application-granted" topic instead of the "unload" event to trigger the uninstall script. I do it this way because closing the browser window is not the same as quitting the application. You can have more than one browser window open, or other windows open, such as View Page Source or Javascript Console. It's unlikely that going with the "unload" event will cause problems, but it's better to stay on the safe side. There is one downside, though. An observer is created for each browser window (again, it's unlikely to have more than one when you're uninstalling the extension), so the uninstall script will be called for all observers if the user chooses the Exit menu option, closing all windows at once (very, very unlikely). This means you should plan your uninstall script so that it can be executed more than once without causing any damage.
That's it! Now you have an nice uninstall script where you can do all the cleanup you need. This solution was based on code found on a comment in the Two Ells blog, but it does have a couple of improvements.
Labels: extension, installation, observer, uninstall, uuid, xul
![]()